Salesforce + Internet of Things (IoT)
Salesforce is not only the world #1 CRM (Customer Relationship Management) software provider. It is also well known for their Sales Cloud, Service Cloud and Marketing Cloud platforms. Recently, Salesforce introduced their IoT Cloud to create new business opportunities with the data streaming from the internet-connected smart devices.
As part of this, they also recently enabled a free IoT Cloud explorer edition for developers. This blog post / tutorial is about implementing a simple IoT project with Salesforce IoT Cloud Explorer and a Raspberry Pi single board computer. More precisely, we will create a smart fridge business case by connecting a digital temperature sensor with Salesforce.
For more info about Salesforce, visit their interactive learning platform: Salesforce Trailhead.
Why IoT?
Internet of things basically means that every device connected to the Internet can be controlled and monitored from anywhere in the world. As a simple example, if your home refrigerator is a connected device, its internal temperature, humidity and/or content will be analyzed by sensors and sent to a cloud platform in real time. If your smart fridge behaves abnormally or goes empty, a real time service alert could be sent to the appropriate people. And the world of IoT has even more complex scenarios than this.
Business case – Smart fridges in airplanes
Challenge
Flying Fridge is an existing Salesforce customer that builds and sells airplane refrigerators to commercial jet manufacturers. Currently they don’t have IoT concepts applied to their refrigerators. Should any issue arise, e.g. an abnormal internal temperature increase, there is no way to inform service people in real time.
Solution
We are going to introduce the concept of smart fridge. Flying Fridge will monitor the interior temperature of their devices and open a service case if a refrigerator’s interior temperature reaches 50°C or more. Inside every fridge, we will put a digital temperature sensor connected to the Raspberry Pi single board computer. The latter will send real-time temperature readings to Salesforce. Last, the Salesforce event processing engine will take the necessary actions based on the streamed data.
How to implement this Salesforce connected fridge project?
For this experiment, we are going to use the Salesforce IoT Cloud explorer edition. But first you need to complete a ”trail” and a small assignment which will give you the basic knowledge of dealing with digital temperature sensors and the Raspberry Pi. Below are the prerequisites for this project.
Prerequisites
To continue this tutorial, you need to complete two existing projects. After that you are ready to begin.
You can complete this trail by creating a free Salesforce developer account here.
This trail will teach you the following:
- Introduction to Salesforce IoT Explorer edition
- Creating Platform Events
- Getting data from Salesforce standard objects in IoT scenarios
- Creating contexts
- Setting up Orchestration
This tutorial will guide you through on how to connect the DS18B20 digital thermometer to a Raspberry Pi, how to measure the temperature using a simple Python program and how to build a real time temperature data service with Salesforce IoT Explorer edition. I strongly recommend you to complete the above two projects if you want to continue this experiment.
For those of you who want to watch the step by step process, I’ve created a small video clip while executing this project.
If you want to continue the experiment for yourself, keep on reading for more details.
Modifying the orchestration rules
Salesforce IoT Orchestration is a nonlinear event processing engine. You can think of it as a state machine which will take the necessary actions based on the incoming events data. In this step we will do a little modification to the Orchestration that we created in the Salesforce IoT Explorer edition basics trail. Your existing orchestration rules should look like the below screenshot.
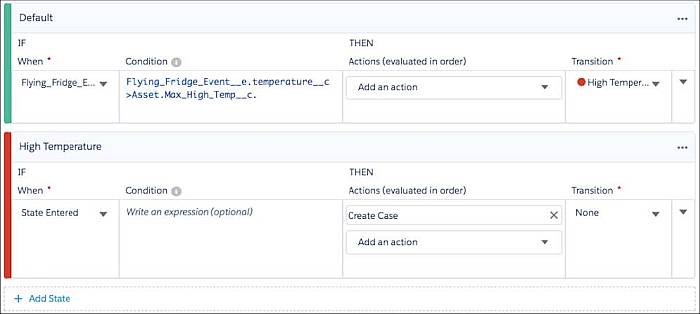
It has a rule to change the status from Default status to High Temperature status and also create a new Case record when it changes the status to High Temperature.
But there is no rule to change the status back to Normal (Default) status from the High Temperature status. So, we will add a new rule to do this. Follow these steps.
- First, rename the Default status as “Normal”
- Then, click on the 3 dots icon on the right side of the High Temperature status, then click on “Add rule”
- Then, click on the drop down menu icon and select “Fridge__Event__e” platform event
- Then add the below formula for the condition:
Fridge_Event__e.temperature__c <= asset.max_high_temp__c
- From transition (on the right side), select “Normal”.
This new rule will change the status back from high temperature to normal when the temperature reduced less than or equal to 50°C.
- Click on “STATES” to see the machine state for your rules.
- “Activate” (on the top right corner) your orchestration to continue.
Note : Tick the check box “Delete all existing orchestration instances” when you activate it.
Configuring Raspberry Pi
I used the Raspberry Pi 3 Model B for this project. Let’s assume that you’ve already done the DS18B20 Thermometer Project and the system configuration to support the One Wire protocol for Pi.
You need to install below two additional Python libraries for this project.
- Requests: This library will help to perform web service requests. In some cases, the request library will be available in Raspbian OS by default.
- Simple Salesforce: This nice library was written for Python programmers to deal with Salesforce easily. More info here.
Open a new terminal window and enter the command below to install the Requests library. (These commands will download and install libraries. Please make sure your Pi is connected to the internet.)
pip install requests
I have the Raspbian Jessy operating system and the requests library is already available for me. Enter the below command to install the Simple Salesforce library:
pip install simple_salesforce
Now your Raspberry Pi has the required software to complete this project.
Schematic
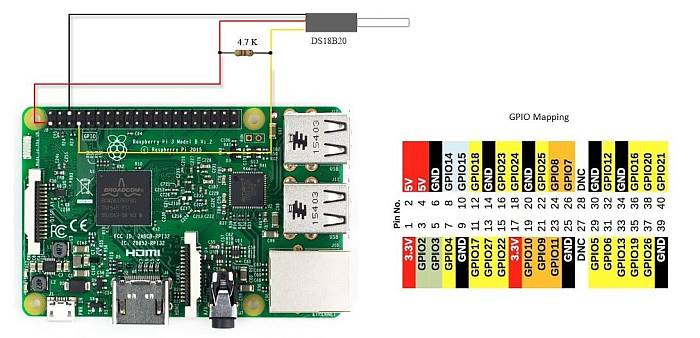
Use the above schematic to set up your devices. I used the waterproof version of the DS18B20 digital temperature sensor. It needs an external 4.7 K resistor as on the above schematic.
Let’s assume that this sensor is placed inside one of the Flying Fridge refrigerators.
Python Program
Here is the Python source code for this project:
from simple_salesforce import Salesforceimport osimport globimport timeos.system('modprobe w1-gpio')os.system('modprobe w1-therm')base_dir = '/sys/bus/w1/devices/'device_folder = glob.glob(base_dir + '28*')[0]device_file = device_folder + '/w1_slave'sf = Salesforce(username='your-sfdc-username', password='password', security_token='security-token')print(sf);def read_temp_raw():f = open(device_file, 'r')lines = f.readlines()f.close()return linesdef read_temp():lines = read_temp_raw()while lines[0].strip()[-3:] != 'YES':time.sleep(0.2)lines = read_temp_raw()equals_pos = lines[1].find('t=')if equals_pos != -1:temp_string = lines[1][equals_pos+2:]temp_c = float(temp_string) / 1000.0temp_f = temp_c * 9.0 / 5.0 + 32.0return temp_c, temp_fwhile True:print(read_temp())data = [{'serial_no__c': '1001','door_open__c': 'false','temperature__c':read_temp()[0]}]sf.bulk.Fridge_Event__e.insert(data)time.sleep(5)print("Platform Event Sent")
Save the above code as a new Python code. Use the file name sfdc18b20.py
Please note that the Simple Salesforce Python library provides many ways to authenticate and connect to your Salesforce. As I used my Salesforce credentials, please change the below line accordingly:
sf = Salesforce(username='your-sfdc-username', password='password', security_token='security-token')
This program will read the temperature from the sensor and perform a web service call to generate platform events on Salesforce every 5 seconds. According to our use case, you can assume that the temperature reading is coming from the airplane refrigerator. The Orchestration on Salesforce will open a case when the temperature exceeds 50 degrees.
Running the project Run the above Python program by entering the below command:
Sudo Python sfdc18b20.py
The terminal window will show the temperature values (in both Celsius and Fahrenheit) as well as a message “Platform event sent” when the device successfully sends a platform event to Salesforce. If the temperature of the sensor is below 50°C, the status will be Normal on your orchestration.
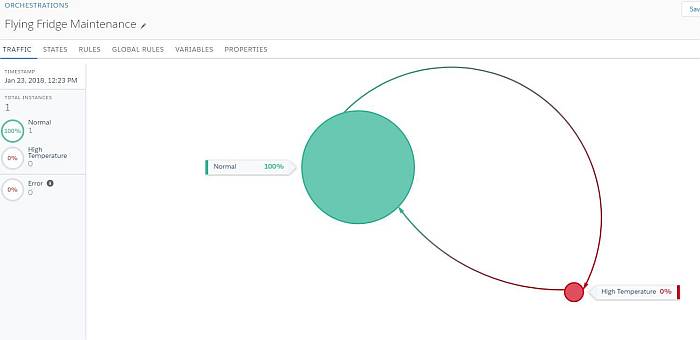
Increase the temperature of the sensor by putting your sensor inside a hot water glass (simple trick for our experiment). When the temperature reaches at least 50°C, the status will be changed to “High Temperature”.
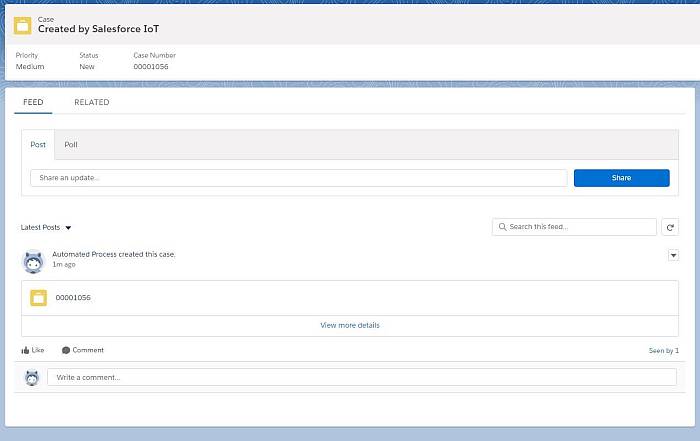
If you open cases on Salesforce, you will see that a new case has been created to indicate the service people about this incident.
When the temperature decreases below 50°C, the status will change back to “Normal”.
Conclusion
Hope you enjoyed this project. Please note that Salesforce introduced two editions of the IoT cloud: IoT Explorer edition (freely available for developer orgs) and IoT Cloud Scale edition (with a licence fee and extra powerful features).
If you faced any difficulties while doing this project or if you have any question, feel free to comment or contact us, I’d be happy to help. Good luck!